Little Robot Arms
As part of a project, I found I needed to control the strings of a guitar with actual little robot mechanisms. For the benefit of those that may like to do something similar but are unfamiliar with the basics, here's some details about it! Driving servos with an Arduino is pretty simple. If you've any coding and electronics experience then it's a piece of pee(tm). If not, then it's still not too hard. I'll skip things like installing the software you need to set up programming an Arduino. If you need need that, a quick web search will sort you out. I'll give a kind of overview / broad-brush thing here... :)
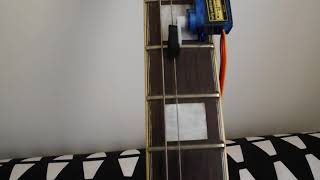
Servos are little mechanisms that are used mainly in radio controlled models. They're a package of electric motor, gears and electronics. Most (but not all) are designed to move the arm to a certain angle, depending on the signal you send it, and leave it there until you tell it otherwise. They come in different sizes and strengths - these weeny little ones are powerful enough to hold down a guitar string but not much more. They have three wires - Plus Volts and Minus Volts for power - I've attached 6V worth of batteries here. Most servos are pretty flexible about the voltage they need. They should tell you whats appropriate.The third wire is the signal line that you use to control it.
The Arduino is a tiny, single board computer that is insanely cheap. You can get them for around £2.50 each. They are designed, amongst other things, to be good at sending and receiving signals. They're not the only device of its sort - just my current fave, and popular with arts-ee projects. You write a short, simple program on your PC and send it to the Arduino via a USB cable. The Arduino runs the program every time its powered up. It remembers the program when the power is off, ready for next time. The USB cable can supply power (from a PC or phone style charger), or you can give it a battery.
The Arduino has a lot of pins that it can send and receive signals on, called things like D1, D2 etc. Solder one of these to the Signal wire on the servo (coloured Orange on mine. Possibly different on yours). The servo also needs power. This could come from the Arduino, but a more reliable idea is to give it it's own battery, probably 4.5 to 9V - check what your servo would like. (Red wire for +Volts, Brown wire for -Volts on my servo). The -Volts connection to the servo must also connect to a Ground (a.k.a Gnd) pin on the Arduino. (ask me if you want to know why). That's all the electronics! :)
Here's a little info on the signal that's sent to the servo, though you don't actually need to know this! The signal is a repeating pulse - which is to say the signal wire carries 0 Volts most of the time. Then it's switched to +5 Volts for a short time, and then back to 0 Volts. After a little pause the whole thing repeats. How long the pulse stays up at +5 Volts is what the servo pays attention to. The length of time translates to an angle for the servo to turn to. Shorter or longer time means smaller or larger angle. Typically, a servo will have a range of about zero to 180 degrees it can turn through. For the curious, the length of the pulse is around one to twenty milliseconds. The Arduino will handle this quite invisibly for you though! :)
Finally, the code. You'll need the (free) Arduino programming environment installed on your PC. (Search, download, shouldn't be too spooky). First thing to note is here I'm using a handy add on 'library' for the Arduino called Servo. The library basically does all that pulse business for you :) Do a search for Arduino Servo Library, or I got it from here: https://playground.arduino.cc/ComponentLib/Servo
You'll need to download the file and unzip it to the right place. Grab a quick tutorial from the web on installing libraries if need be. Next to note is that the following code assumes you've soldered the servo signal wire to Arduino pin 1 (a.k.a. D1).
#include <Servo.h> //This tells the Arduino you'll be using the Servo library
Servo myservo; // myservo becomes a name to refer to your servo by
void setup() { pinMode(1, OUTPUT); // Tells the Ardunio that pin D1 will be used to send
// signals Out rather than In. myservo.attach(1); // Tells the Ardunio we're using pin D1 }
void loop() { //This is a loop - it repeats over and over myservo.write(0); // Send the message 'turn to zero degrees' to the servo delay(2000); // Wait 2 seconds servo1.write(180); // Send the message 'turn to 180 degress' to the servo delay(2000); // Wait 2 seconds } // End of the loop so do it all again!
And that should be that. Making it into something useful is all your own problem!.. :)